Table of Contents
Last Updated: June 14th, 2024
Let’s take a step-by-step tour through your WordPress site and see how the different functions work and how to make your new site your own. During the first part of this tutorial, please don’t change anything within the program unless it is part of the tutorial. After following these steps, you’ll soon be changing everything.
Accessing Your Website
Follow the steps below to access the dashboard of your WordPress website and begin managing your website.
Log Into Your Website
 Begin by logging into the “administration area” or the back end of your website. Visit your site’s login page by placing “wp-admin” after your domain name (e.g. [site-url]/wp-admin).
If for whatever reason you do not remember your username and password, you can recover this information by clicking Lost your password? in the login prompt screen.
Two-Factor Authentication
Two-factor authentication adds another layer of security to your site that requires not only a password and username when logging in but also a passcode that you can only generate on your smartphone. Using a username and password together with a piece of information that only you can access makes it harder for potential hackers to gain access to your website.
For more information on two-factor authentication, check out the entry in the WordPress Codex.
Enabling Two-Factor Authentication
Navigate to your profile page to enable two-factor authentication, as well as sync their account with the Google Authenticator app. Scroll to the bottom and click Enable.
You’ll then see this screen:
Follow the steps by downloading Google Authenticator for your phone, scanning the barcode, and entering the six digit passcode that the Authenticator app generates.
Click Verify and you’re all done!
Using Two-Factor Authentication
Next time you log into your website after you enter your username and password, you’ll be asked to enter a passcode. Just fire up the Google Authenticator app on your phone and enter the passcode.
Media Library Basics
The Media Library is where you can upload and manage your images and other documents all in one place. PDFs, Word documents, and graphics are all added to the media library for use throughout your entire website.
Uploading + Link to Media
If you would like to upload a graphic, such as adding a picture to your post, then you must first upload the content to the Media Library. Once there, upload your image by clicking Add New, by choosing Select Files, or by dragging and dropping an image into the browser window.
Once the file uploads completely to the list below, select the recently added thumbnail to reveal the image’s full options. For SEO and accessibility purposes, it is highly recommended that you provide a descriptive Alt Text for the image. This text tells search engines and users using screen readers a bit more about the image’s contents.
You can use the URL provided in the top-right corner of the media settings on any other page throughout the site.
Editing Images
This section will describe how to use WordPress’s built-in image editor. If an image is saved in the media library and already in use, do not update this image. This may update it in other sections of the site. Add a duplicate and alter from there.
Go to the Media Library section in the left sidebar. Click on an image in the list to view its settings. Just below the image click the Edit Image button.
From left to right, you have options to crop, rotate to the left, rotate to the right, flip vertically, flip horizontally, undo, and redo changes to your image. If you wish to crop, drag your cursor over the image, to the proportions you would like visible, then click the crop button in the top left. If you do not like the change you have made, click the back or forward arrows.
If you would like to change the size of the image, update the New Dimensions in the right column under Scale Image. This will automatically scale your image proportionally and you cannot scale images up, only down.
For more information, please see the Edit Media page of WordPress’s documentation.
Managing Content
Preview Content and Tagging
Preview content typically includes a featured image, title, excerpt, and possibly some detailed text about the author and publication date. This content is important because it is your visitor’s first impression when they see your content on social channels, search engines, and even feeds within your own website. For more SEO tips and tricks, go to the SEO with Yoast section.
Add An Excerpt
At the very bottom of any piece of content, you should see a field called Excerpt. If you do not, you can find Screen Options in the very top right corner of your editing window. These options enable you to hide or show fields that may or may not be relevant to you. Ensure the Excerpt fields is checked. Excerpts are typically 150 to 160 characters in length to align with SEO (Search Engine Optimization) best practices.

Tagging Content
In any content type, you should see several taxonomies including, but not limited to, Categories, Tags, Resource Types, and Featured Areas. These can be found in the right sidebar under publishing options. There are many different reasons to tag content, but typically they are used to narrow down content that is filterable or dynamically generated.
- Categories are typically available for any content type and act as a general bucket for any miscellaneous use-case.
- Topics are specifically used to enable users to filter content based on a particular area of conversation. Example: Education, Healthcare, etc.
- Resource Types are specific to Resources and are used to filter content by the kind of media. Example: Infographics, Videos, Reports, etc.
- Featured Areas are used to featured specific content throughout your site and are not used to enable users to filter your content. Please note that you may need to uncheck previously added features in order to allow the correct content to appear in the featured block. Example: Feature on the homepage, Feature in navigation.
- Tags are the exception to the rule. They are strictly used for SEO purposes and are not used to filter content. Add tags or keywords to a post so search engines can get a better understanding of your content.
News Articles
News allows you to manage and edit your in the news and press release content. Click News in the left sidebar of your dashboard and then Add New to create a new news article.

First, add a title for the article. This will be the main title of your post and will be used to generate a link to the content. Then, add your main body content using the WYSIWYG (What You See Is What You Get) editor. For more information about the WYSIWYG, check out this in-depth breakdown of the WordPress WYSIWYG. Finally, select any categories/taxonomies that apply to the post and upload a featured image. The featured image is the graphic that is used when the post is shared on social channels and in filterable lists throughout the site. The ideal image size is 1200px wide and 630px tall.
Adding A Source
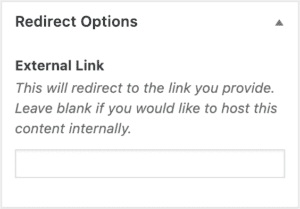
If you do not want to host the content on your site, and instead would prefer that users arrive at the original article, you can add the source article URL to the External Link field. Your custom featured image, excerpt, and title will still appear in filterable lists throughout the site.
Review the descriptions of any other fields to enhance your content.
Publishing A News Article
Once you are ready to review your updates, you can click the Preview button in the top right corner of the screen, under your publishing options. This will allow you to see what the page will look like before publishing.
When you are ready to publish your content, you can click the blue Publish button to post the content immediately or select a date and time to schedule your post. Please note that times are set in military time, so if you would like a blog post to publish at 3pm, you would need to set the time to 1500.
People
The People post type allows you to manage and edit your staff and board of director bios. Click People in the left sidebar of your dashboard and then Add New to create a new bio.
Work through the list of fields and include name, position, etc. Finally, select any categories/taxonomies that apply to the post and upload a headshot to the featured image. The ideal image size for these headshots is 630 x 475.
Review the descriptions of any other fields to enhance your content.
Publishing A Person Post
Once you are ready to review your updates, you can click the Preview button in the top right corner of the screen, under your publishing options. This will allow you to see what the page will look like before publishing.
When you are ready to publish your content, you can click the blue Publish button to post the content immediately or select a date and time to schedule your post. Please note that times are set in military time, so if you would like a blog post to publish at 3pm, you would need to set the time to 1500.
Events
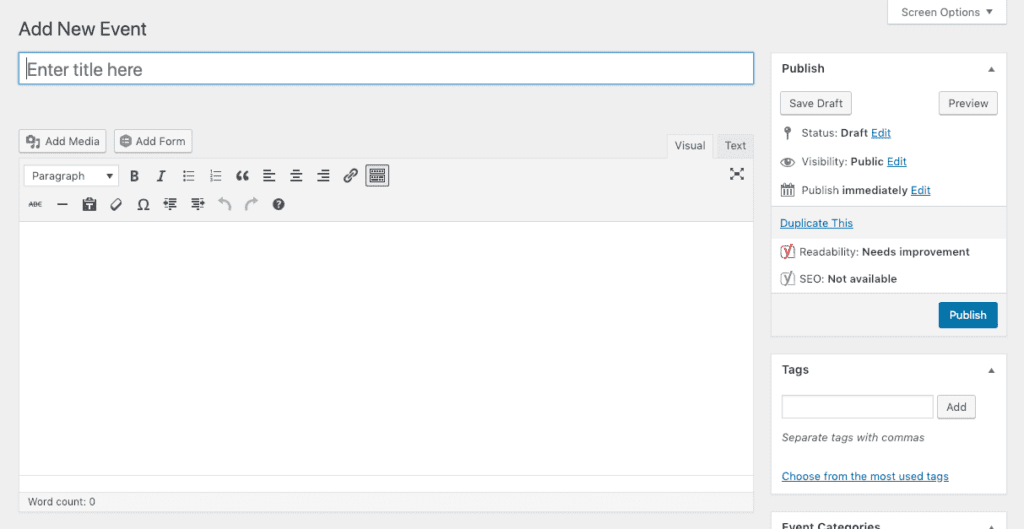
Events allow you to manage and edit your conferences, webinars, and more. Click Events in the left sidebar of your dashboard and then Add New to create a new event.
First, add an event title. This will be the main title of your event and will be used to generate a link to the content. Then, add your main body content describing the event using the WYSIWYG (What You See Is What You Get) editor. For more information about the WYSIWYG, check out this in-depth breakdown of the WordPress WYSIWYG. Finally, select any categories/taxonomies that apply to the event and upload a featured image. The featured image is the graphic that is used when the post is shared on social channels and in filterable lists throughout the site. The ideal image size is 1200px wide and 630px tall.
Scheduling Your Event
Scroll down to find the Scheduling Options section that allows you to add a start date, end date, start time, end time, location, and timezone. Using these options allows past events to be removed from any upcoming events feeds on your site automatically. If you would prefer that past events are removed from your site completely after the ever, you can schedule an expiration date under Publishing Options.
Review the descriptions of any other fields to enhance your content.
Publishing An Event
Once you are ready to review your updates, you can click the Preview button in the top right corner of the screen, under your publishing options. This will allow you to see what the page will look like before publishing.
When you are ready to publish your content, you can click the blue Publish button to post the content immediately or select a date and time to schedule your post. Please note that times are set in military time, so if you would like a blog post to publish at 3pm, you would need to set the time to 1500.
Letters
Letters allows you to manage and edit your Letter files. Before beginning this process, upload your letter asset by using the media library. Copy the URL to your uploaded file and then once done, Click Letters in the left sidebar of your dashboard and then Add New to upload a new letter.

First, add a title for the letter. This will be the main title of your post and will be used to generate a link to the content. Then, add the URL to the file you uploaded to the media library by pasting it in in the URL field. You can then add a description of the letter in the Excerpt field.
Publishing A Letter
Once you are ready to review your updates, you can click the Preview button in the top right corner of the screen, under your publishing options. This will allow you to see what the page will look like before publishing.
When you are ready to publish your content, you can click the blue Publish button to post the content immediately or select a date and time to schedule your post. Please note that times are set in military time, so if you would like a blog post to publish at 3pm, you would need to set the time to 1500.
Newsletters
Newsletters allows you to manage and edit your Newsletter content. Before beginning this process, upload your newsletter asset by using the media library. Copy the URL to your uploaded file and then once done, Click Newsletters in the left sidebar of your dashboard and then Add New to upload a new letter.
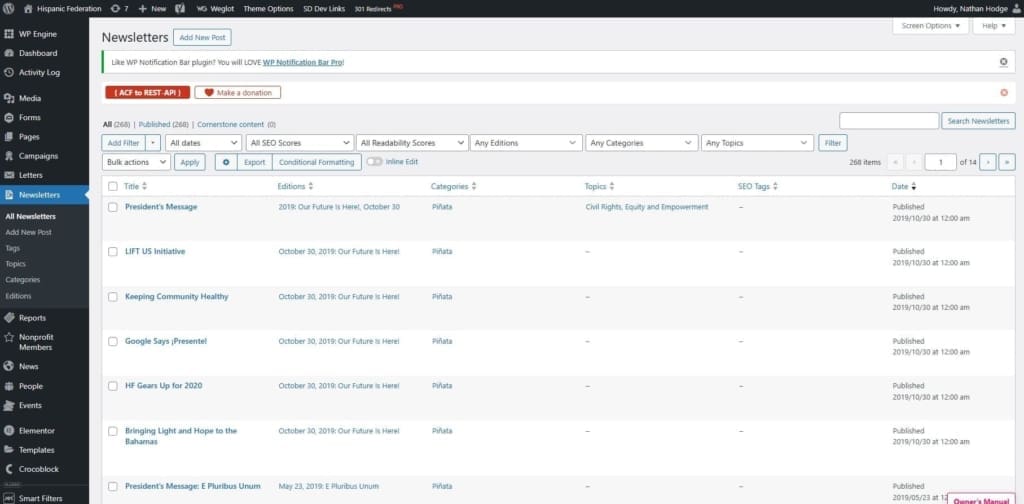
First, add a title for the newsletter. This will be the main title of your post and will be used to generate a link to the content. Then, add the URL to the file you uploaded to the media library by pasting it in in the URL field. Then, add your main body content using the WYSIWYG (What You See Is What You Get) editor. For more information about the WYSIWYG, check out this in-depth breakdown of the WordPress WYSIWYG. Finally, select any categories/taxonomies that apply to the post and upload a featured image. The featured image is the graphic that is used when the post is shared on social channels and in filterable lists throughout the site. You can then add a description of the letter in the Excerpt field and select Related Content items. If you do not select specific related items, the most recent items will be selected by default.
Publishing A Newsletter
Once you are ready to review your updates, you can click the Preview button in the top right corner of the screen, under your publishing options. This will allow you to see what the page will look like before publishing.
When you are ready to publish your content, you can click the blue Publish button to post the content immediately or select a date and time to schedule your post. Please note that times are set in military time, so if you would like a blog post to publish at 3pm, you would need to set the time to 1500.
Reports
Reports work almost exactly the same way as Newsletters is detailed above except you need to access the Reports menu instead. Outside of that, the only thing that is different is that you will need to upload your report directly here instead of using the media library. You can do so by using the fields in the Attached Documents field. There you can enter the text to appear on the button attached to the report, upload the file, or provide an external link if the report is hosted elsewhere. You can also add more than one report by hitting the Add Attachment button on the right of the field.
Nonprofit Members
Nonprofit members allows you to manage the list of nonprofit members on associated feed pages. To access this menu, click Nonprofit Members on the left side of the Wordpress dashboard.

Click add new post to create a new member. You can also edit existing members by hovering over their name and then selecting Edit. In the menu for the new item, add a title for the Member, a description of the member in the WYSIYG field. For more information about the WYSIWYG, check out this in-depth breakdown of the WordPress WYSIWYG. Then select the state in the checkbox menu on the right. Then hit Publish.
SEO with Yoast
SEO is an extremely important aspect of your site and something to consider whenever you update or add any new site content. We’ve installed a tool called “Yoast SEO” which will help guide you towards matching your site content with important keywords.
Using Yoast SEO
Content (Tab that looks like a traffic light)
- The Snippet Editor previews what your page looks like in a Google search result. Click “Edit Snippet” to update the SEO title, slug (also known as the URL), and the meta description.
- Focus keyword: chose the main keyword or phrase that matches the content on the page.
- Meta keywords: additional keywords that pertain to the page content
- Content analysis: Based on your focus keyword, the content analysis will analyze the page content based on a benchmark of checks to ensure the focus keyword makes sense. This includes an appearance in the URL, meta description, title length, etc.
Social (Tab that looks like sideways “v”)
This section enables you to personalize the social media title, description and image representation for Facebook and Twitter should you choose. For images, be sure to pay attention to the recommended sizes listed in the descriptions.
On-page Optimization
Title Tag
- Avoid duplicate title tags
- Keep title tags at 55 characters or less in length, including spaces.
- Your title tag should be written like this: Primary Keyword – Secondary Keyword | Brand Name
- Use a dash in between your keyword phrases and a pipe at the end before your brand name
Meta Description
- Write compelling meta descriptions (for CTR)
- 150 to 160 characters is the recommended length
- Avoid duplicate meta descriptions
- Do not use quotes or any non-alpha characters
- Use target keywords in the description
H1, H2, H3
- Use H1 Tag for Page title
- Use your keyword phrase once in your H1 tag
- Use H2, H3 tags for subheadings if there are multiple sections
Anchor Text
- When linking to another page on the same site from within content, select good anchor text (keywords) to use in the actual link and do this often. For example: “We offer *target keywords* services,” rather than “Click here.”
Image ALT tags and filenames
- Include your keyword phrase in the name of your image. Name all of your images in a way that describes what they are.
- Do not use non-alpha characters in your image or file names (no %, &, $, etc)
Footer Content
There is an Elementor template that contains the content of the global footer.
Elementor Page Builder
For more information about Elementor components and how to use them, subscribe to Elementor’s YouTube channel. There are a lot of resources there, to help you get started, watch this introductory video that will go over building pages, using editing tools, using page templates, and creating your first section. We have also included some helpful tips to get you rolling below the video.
Saved templates can be found in your site’s Asset Board.
To Access the Elementor Page Builder
Select the ‘Pages’ menu on the left hand side in the WordPress dashboard. In the ‘Pages’ menu, find the page that you wish to make edits to and then click ‘Edit with Elementor’. This will open the page in the Elementor builder dashboard.
To Edit Text on the Page
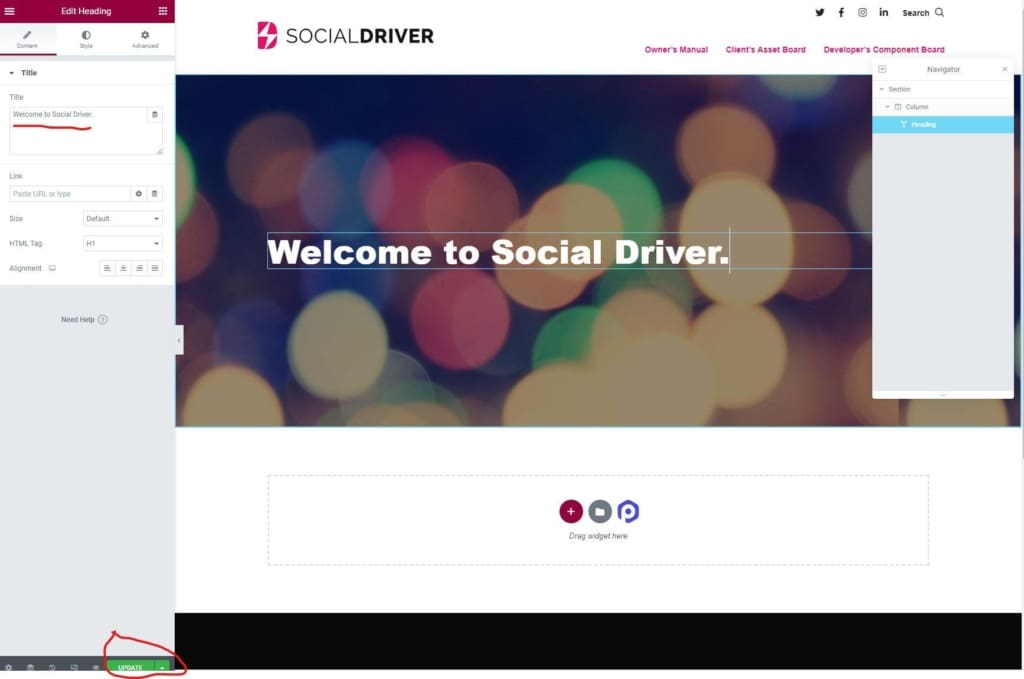
Click on the piece of text that you would like to edit on the page. You will notice the menu on the left change. The widget is similar for headings or paragraph text. Once it is open, click into the body of text in the field on the left as seen below. You can edit the content here and then when finished, make sure to hit update which is also seen in the image below. You will need to hit update every time you finish a session of updates.
To Replace an Image
There are multiple ways to replace images in Elementor depending on how they are being used. We will discuss two of the most popular which is with the Image widget and then replacing a background image.
Elementor Image Widget
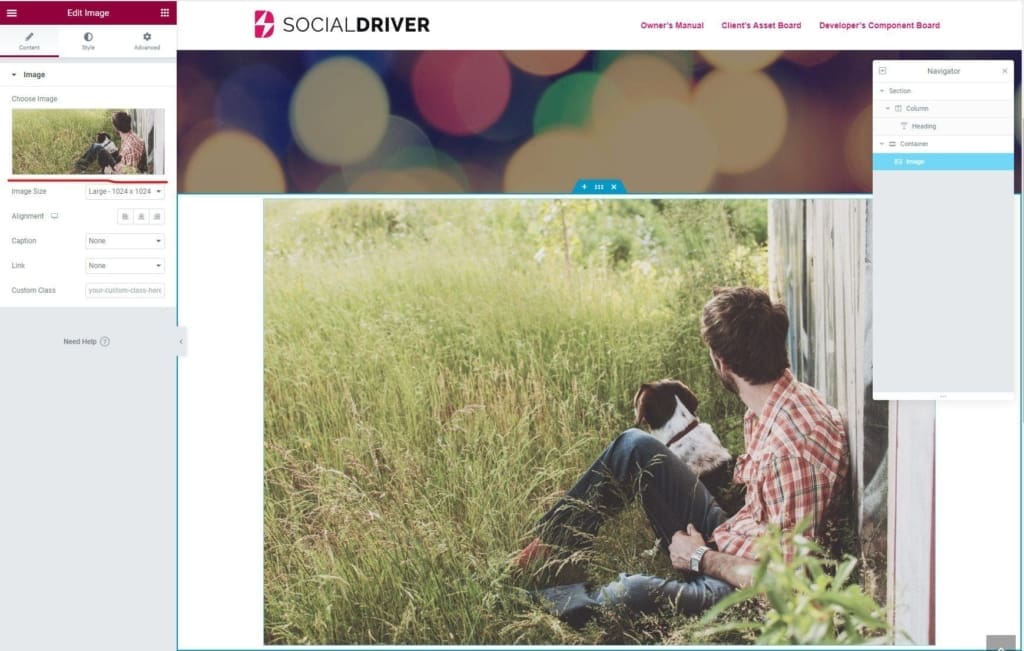
To replace an image built with the widget, click anywhere on the image. This will open the Image menu on the left. You will see your image in that menu. To replace it, click on the image there. This will open a media menu that looks similar to the menu used to upload media to your library as discussed here. You can choose to upload a new image or select one from the existing images already. Once you have it, click ‘Insert Media’ in the bottom left and you will be good to go.
Replacing a Background Image
Some images are not inserted on a page with the Image widget. The vast majority of images that are not using the widget are background images. They could be a section, container, or column background. Each is replaced the same way:
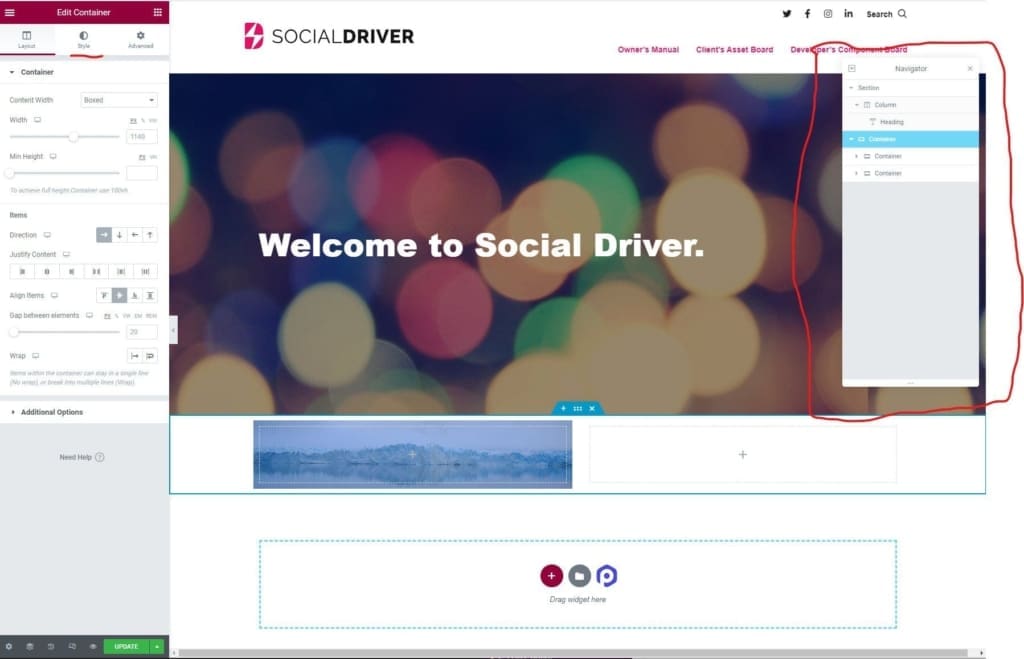
Find the section, container, or column where the image is located using the Elementor navigator seen circled below. A section is the outermost box that contains all the elements in a component. A column is a subsection within those sections that divides content further. A container can be either of these things, it’s just labeled differently in newer versions of Elementor. Once you know which of these you want to change the background on, click the item in the navigator. You will see the menu change on the left in the builder. Click the middle tab labeled ‘Style’ which is also shown below.
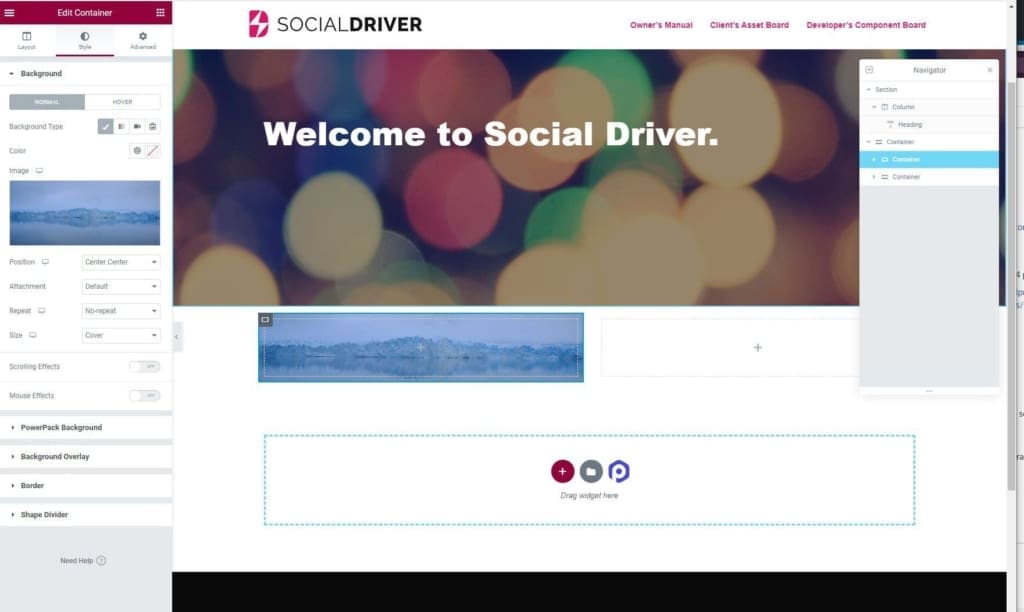
In the ‘Style’ menu, you will see a picture of the current background image (if there is one). Click on the image and you will be able to swap the asset out for another. This part is the same as swapping out in the image widget as documented above. You can either upload a new image or select an existing one from the library. There are also several settings in the menu that allow you to control the position, size, and repeat of the background image. To find out more about these and other tips on background images, check out this article.
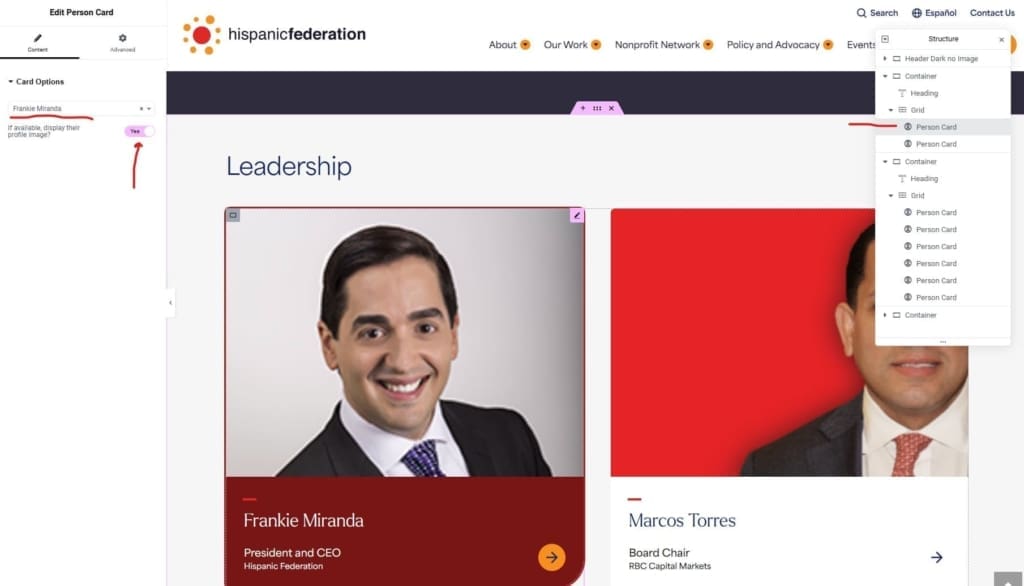
Editing a Person Card
We have created a custom widget in order for you to add cards to link to the People post types on your site. The widget is called a Person Card. It can be dropped in as a template or for pages that have the cards already on them, can be accessed from the Elementor navigator. Once you have the card, you just enter the person’s name on the left and then decide whether or not you want to show the person’s image or not. If this is marked yes, the image will be pulled from the person’s post type. If the image needs to be changed, it needs to be changed in the back end of the custom post type which is described in the People section.
Editing a Hover Heading Box
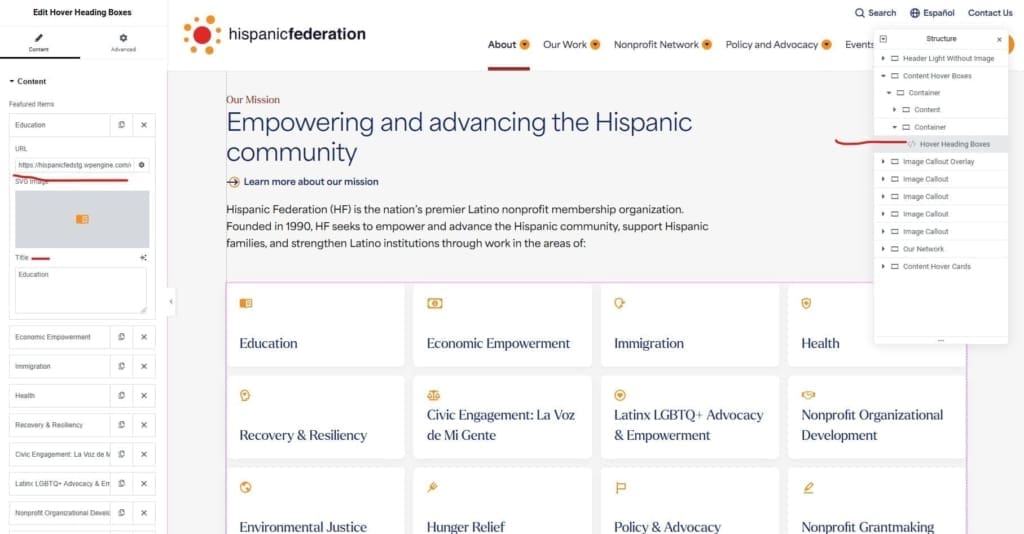
We have also put together another custom Elementor widget called a Hover Heading Box. This widget creates a card that is good as a quick way to display several options for users to find more information on specific programs or areas of work. To update one, select it in the Elementor navigator and then the Hover Heading Box menu will open on the left. From there, enter the title of the card, the URL it will link to, and the SVG image file you want to associate with it. Then hit publish to save the info. If you want to create another one, it is best to duplicate an existing one by right clicking the item in the navigator and then editing the info as needed.
Editing Hover Card Section
Hover cards are similar to Hover Heading Boxes, but instead of being edited individually, they are edited as a section. Find a page with a Hover Card section and click an item within it. This will open up the Hover Card menu on the left.
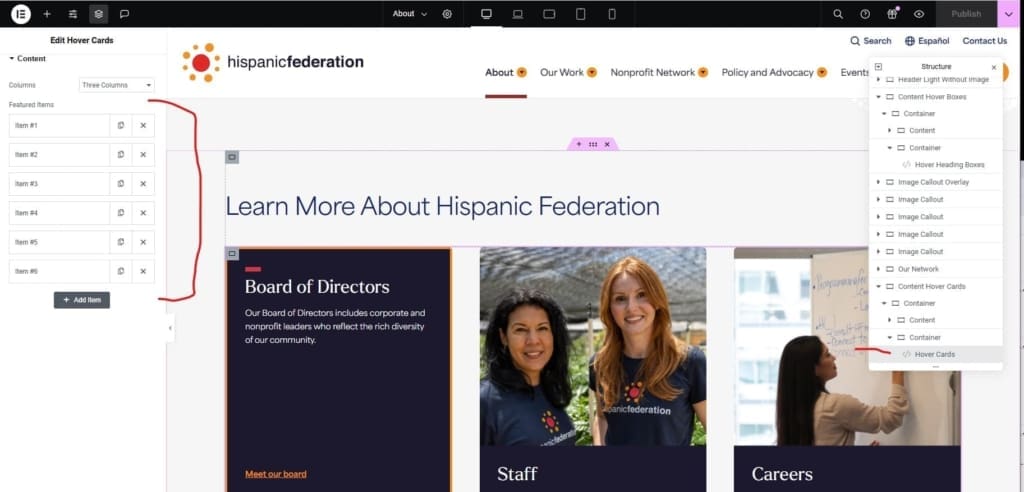
Within each item in that menu is where you will edit the individual cards in that particular section. You can also add items as needed. You can set how many columns you want to display on each row as well. Click an item which will open up the fields to edit a specific card. From there you can edit the name of the item, the image associated, the written content that will display on hover, the URL clicking the card will take the user to, and the button text that displays on hover as well.

Adding Sidebar Links
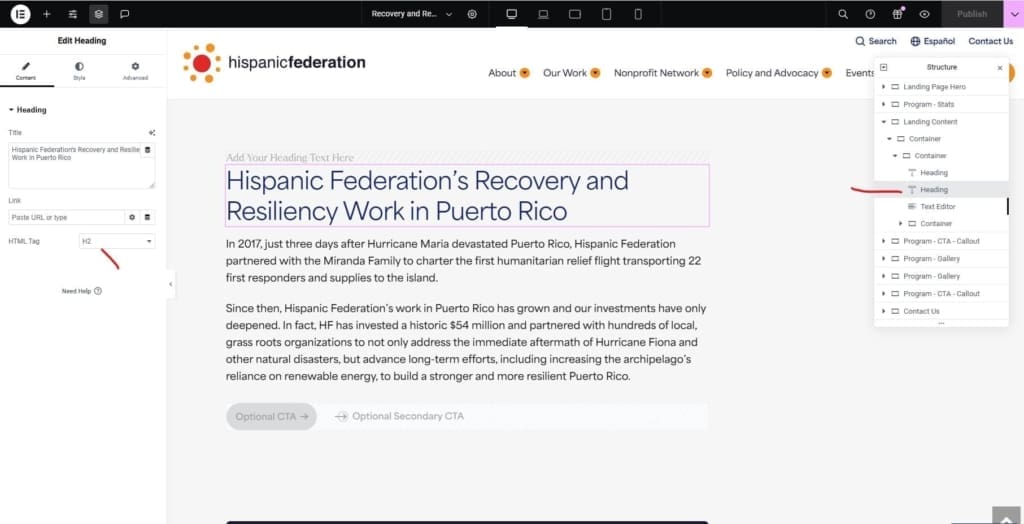
Some of your pages have a sticky sidebar that act as a table of contents for the page it featured on. The links contained in the sidebar are not controlled in Elementor in the normal way where you would click within the sidebar and edit the content. Instead, any heading that is marked as an h2 on the page will automatically be added to the sidebar upon page load.
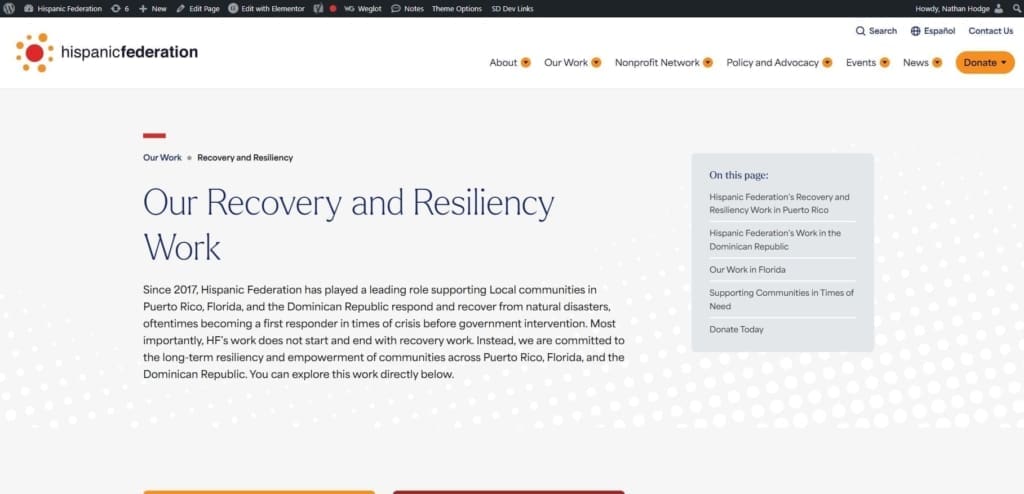
Heading tags can be edited by selecting the desired heading in the navigation menu (or simply clicking on the heading itself), and then using the dropdown menu on the left marked HTML tag.
